Cleft lip and palate repair surgery is a monumental step and a defining moment in your child’s treatment journey. The procedure profoundly impacts their ability to speak, feed, and their overall quality of life. The success of this delicate surgery depends not only on the expertise of the surgeon but equally on the diligent post-operative care for cleft lip and palate surgery provided by parents at home. While the recovery period can be challenging, having precise information and following surgical instructions will ensure a smooth and successful healing process. This article is designed as a complete, step-by-step resource to guide parents through the essential cleft lip and palate surgery aftercare.
Understanding the Recovery Timeline
To better manage your responsibilities, we have categorized the cleft lip and palate recovery process into distinct phases, outlining what you should expect at each stage.
Phase 1: The Initial 24–۴۸ Hours (In-Hospital Care)
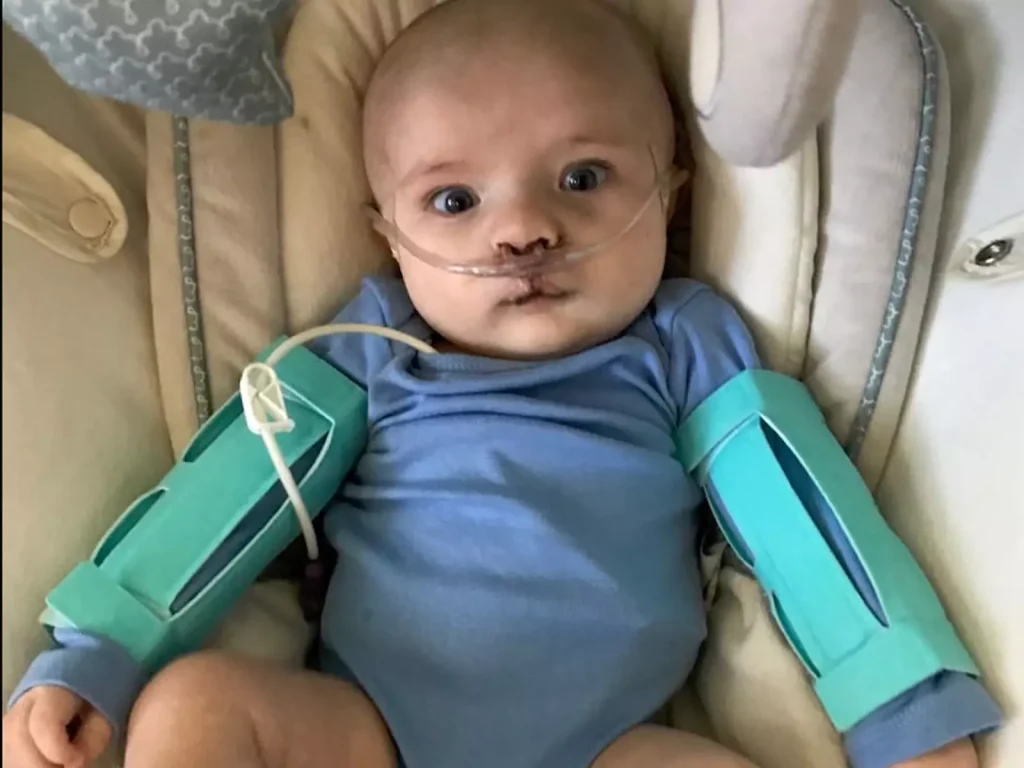
Immediately following the surgery, your child will be monitored closely in the recovery room. Drowsiness, fussiness, or crying due to the effects of anesthesia are completely normal. The medical team will manage pain with specialized medications, initiate the first feedings with clear fluids slowly, and apply Arm Splints (No-Nos) to prevent accidental contact with the sensitive surgical site.
Phase 2: The First Week at Home (The Critical Period)
This is the most critical time, and your role is paramount. The primary focus of the first week of cleft lip surgery aftercare revolves around four key pillars:
- Meticulous at-home pain management.
- Strict adherence to the specialized liquid diet.
- Precise wound cleanliness and prevention of infection.
- Consistent restriction of the child’s activities.
Phase 3: Second Week to Initial Healing (First Month)
During this phase, you will observe gradual improvement. Redness and swelling will steadily decrease, and absorbable stitches (if used) will begin to fall out. In consultation with your doctor, you can slowly begin to introduce soft, pureed foods (like thin cereals and yogurt) back into your child’s diet. The first critical post-operative visit will usually occur during this time for the surgeon to assess the healing trajectory.
Key Principles for At-Home Cleft Care
Having understood the general timeline, let’s explore each essential aspect of home care in detail.
۱. Pain Management and Comfort
Effective pain control prevents excessive crying and strain on the sutures. Administer prescribed pain medication, such as Acetaminophen, exactly on the schedule provided by your doctor, even if your child appears calm.
In addition to medication, implement comfort measures:
- Cuddling: Holding and rocking your child provides emotional comfort and distraction.
- Soft Voice: Speaking gently helps reduce stress and anxiety.
- Soft Toys: Distract the child with toys they cannot put in their mouth or that won’t contact the surgical site.
۲. Specialized Feeding and Nutrition
Strict adherence to the dietary plan is critical for protecting the repair site and accelerating healing after cleft lip and palate surgery.
| Procedure | First Week Diet | Post-First Week | Key Restrictions |
| Cleft Lip Repair | Exclusively clear liquids or milk. | Gradual introduction of pureed/soft foods (e.g., yogurt, thin puree). | NO pacifiers, straws, hard spoons, or bottles that require strong sucking. |
| Cleft Palate Repair | Stricter: Usually only liquids for 3–۴ weeks to protect the sensitive stitches on the roof of the mouth. | Very soft, non-chewable foods (as directed by the surgeon). | NO hard, crunchy, or crumbly foods (e.g., cookies, bread crusts) that could puncture the palate repair. |
Essential Feeding Tip: After every feeding, give your child a small amount of sterile water to rinse their mouth and keep the surgical area clean.
۳. Wound Care and Infection Prevention
Meticulous hygiene is key to preventing infection and ensuring the best cosmetic outcome after cleft lip repair.
- Lip Incision Cleaning: Follow the surgeon’s exact instructions. Generally, the lip suture line should be cleaned several times a day using a cotton swab dipped in sterile water or saline solution. Gently dab the area; do not rub.
- Ointment: Apply a thin layer of the prescribed antibiotic ointment to the lip incision after cleaning.
- Palate Cleaning: Direct cleaning of the palate is usually unnecessary; rinsing the mouth with water after feeding is sufficient.
Signs of Infection: Be Vigilant!
You must monitor for signs of infection. Immediately contact your pediatrician or cleft surgeon if you notice:
- High fever (above 38.5°C or 101.5°F).
- Significantly increased redness, swelling, or pain at the surgical site.
- Yellow or green discharge with a foul odor from the wound.
- Severe fussiness or refusal to drink liquids.
Crucial: Always complete the full course of prescribed antibiotics and administer them at the exact times specified.
۴. Activity Restriction and Protection
Protecting the surgical result requires maintaining a secure environment for your child.
- Arm Splints (No-Nos): Arm splints must be used continuously (usually for 2 to 3 weeks) to prevent the child from touching or rubbing their face. Check them periodically to ensure they are not too tight.
- Activity: Avoid all vigorous or rough play that could lead to a fall or injury to the face.
- Sleeping: Your child must sleep on their back to prevent any pressure from being applied to the surgical site during rest.
The Role of the Cleft Lip and Palate Surgeon

Although your child’s recovery is a team effort, the Cleft Lip and Palate Surgeon remains your primary guide and point of contact in the weeks and months following the operation. The surgeon’s role extends well beyond the operating room; they are responsible for closely monitoring wound healing and ensuring the long-term success of the repair.
At the first post-operative appointment, the surgeon will carefully check the suture line, ensure there are no signs of infection, and remove any non-dissolvable stitches. These follow-up sessions are critical opportunities for you to ask questions and receive new instructions, such as when to begin scar massage or how to manage scar appearance.
Choosing a surgeon who specializes in cleft lip and palate repair is key to achieving the best possible outcome for your child.
Dr. Armin Akbari, an ENT and Specialist Surgeon in Iran, has focused his practice on these sensitive and complex procedures. Having completed advanced fellowship training in plastic surgery and cleft repair, he combines specialized knowledge with an artistic vision to address both the functional correction and the final aesthetic outcome of the child’s face.
To receive a specialist consultation and learn more about Dr. Akbari’s approach to Cleft Lip and Palate Surgery, please contact us. You may also view Dr. Akbari’s Cleft Lip and Palate Surgery portfolio here.
Frequently Asked Questions (FAQ)
No, the sutures are typically placed very securely and will not break from sneezing or coughing. However, if you notice active, bright red bleeding, contact your doctor immediately.
They are typically used for 2 to 4 weeks post-surgery. However, always follow the exact instructions provided by your surgeon.
A few drops of blood-tinged discharge (serous fluid) in the first 24 to 48 hours is normal. But active, bright red bleeding requires immediate contact with your doctor.
Usually after 3 to 4 weeks, and following the first post-operative check-up with your doctor, you may discuss returning to a childcare setting.
The scar is initially red and raised, but it will gradually soften and fade over several months to a year. There are follow-up scar management treatments (like massage or steroid injections) available to further improve its appearance over time.
Cleft lip repair is typically performed around 3 to 6 months of age, and cleft palate repair is usually performed later, around 9 to 18 months of age, to optimize speech development.
No. Direct cleaning is generally not needed for the palate stitches. Rinsing the mouth with small amounts of water after feeding is the primary method of keeping the area clean.